Hiking in the Great Canadian Rockies
The Canadian wilderness – where better to see it other than in the Great Canadian Rockies. Get to exploring what it has to offer deep in its lush, dense forests, in its rich valleys, its roaring rivers and towering giants.
Hiking in the Canadian Rockies has always been a great gift – but not something to take so easy. Beneath its beautiful views hides dangers and risks. We hope to shed light to some of these factors and ensure you can enjoy the great outdoors while being safe and informed.
I have used and relied on many apps and guides online to help me with my hikes throughout the years. Alltrails is one I have used in the past many times and have even subscribed to. I would admit that it is quite useful and I would even still recommend using it to this day. However, I find that their difficulty scale can be quite misleading. Some Hard felt somewhere in between Moderate and Hard. Some Easy ones felt like it was leaned more towards Moderate. In this guide, we would like to broaden that scale wider to cover the gray areas and to explain the difficulty thoroughly.
Difficulty Scale: Expert ,Harder than Hard , Hard, Intermediate, Moderate, Sweaty , Easy, Cake
Estimated Duration : This is a rating I’d give a certain hike – however it may not be 100% accurate and it is taken from my personal experience. It all depends on your fitness level, amount of breaks, weather, trail quality, and more – so take it with a grain of salt.
Banff National Park
Click on the Hike Name link to find the specific hike directly and read all the details!
| Hike Name | Difficulty | Estimated Duration |
| Mount Rundle | Hard | 6-8 Hours |
| Cascade Mountain | Harder than Hard | 8-10 Hours |
| Sulphur Mountain | Moderate | 2-3 Hours |
| Tunnel Mountain | Easy | 30-45 Mins |
| Cory Pass Loop + Mount Edith ( 2 summits ) | Hard | 6-8 Hours |
| Johnston Canyon + Ink Pots | Cake + Easy | 30mins – 2 hour |
| Middle Sister (Canmore) | Hard | 6-8 Hours |
| Devil’s Thumb | Hard | 6-8 Hours |
| Tower of Babel | Hard | 2-4 Hours |
| Sentinel’s Pass | Intermediate | 4-6 Hours |
| Bow Lake Falls | Moderate | 3-4 Hours |
| Lake Agnes + Big Bee Hive | Moderate | 4-6 Hours |
| Heart Creek Bunker | Cake | 30 – 45 mins |
| Mt Jimmy Simpson | Hard | 6-8 Hours |
| Peyto Lake View Point | Cake | 15-30 Mins |
| Kinglet Lake (By Saskatchewan Crossing) | Intermediate | 3-6 Hours |
| Bow Falls + Surprise Corner | Easy | 30mins-1 Hour |
Jasper National Park
| Hike Name | Difficulty | Estimated Duration |
| Wilcox Pass | Sweaty | 2-4 Hours |
| Columbia Ice Field Glacier | Easy | 45mins-1 Hour |
| Wilcox Peak | Intermediate | 5-7 Hours |
| Boundary Peak | Hard | 6-8 Hours |
| Grisette Mountain Ridge – Old Man Trail via Roche Bonhomme Route | Hard | 5-7 Hours |
| Maligne Canyon | Cake | 30mins – 1 Hour |
| Athabasca Falls | Cake | 30-45 Mins |
| Sunwapta Falls | Cake | 30 – 45 Mins |
Kananaskis Provincial Park
| Hike Name | Difficulty | Estimated Duration |
| Prairie View + Barrier Lake | Sweaty | 2-3 Hours |
| Mount Baldy (2 Summits) | Intermediate | 4-6 Hours |
| Wasootch Ridge | Hard | 6-8 Hours |
| Elbow Lake + Rae Glacier | Easy + Sweaty | 1-2 Hours + 2-4 Hours |
| Rawson Lake | Sweaty | 3-4 Hours |
| Sarrail Ridge | Intermediate | 5-7 Hours |
| Mist Mountain Hot Springs | Intermediate | 4-6 Hours |
Yoho National Park
| Hike Name | Difficulty | Estimated Duration |
| Emerald Lake Loop | Easy | 1-2 Hours |
| Emerald Peak ( Counter Clockwise) | Hard | 4-6 Hours |
| Mt Stephen Trilobite Beds | Moderate | 4-6 Hours |
Mount Rundle Summit
Location
Banff National Park
Town of Banff
Difficulty
Hard
1750m Elevation Gain
Duration
8-10 Hours
16-17km


Mount Rundle is one of the iconic peaks dottingBanff’s skyline – its extraordinary sharp shape can be seen from all around town. In fact, its full entire seven peaks is in full display during the drive into the national park from the Alberta side. In this section, I’ll only be covering the most western peak – the peak seen from the town of Banff. The hike covering all 7 peaks is a whole different monster itself with the other end being by Canmore.
Recommendations
Make sure to use a hike app or map. It is quite easy to lose sight of the trail in the boulder field and in the dense forest especially as the path forks into other trails.
Wildlife: Did not see too many wildlife, other than the common birds and squirrels. However, moose, elk, deer, bears and more are known to be in the area of the national park.
Equipment: Hiking poles,
Photos from the Trail
Cascade Mountain Summit
Location
Banff National Park
Town of Banff
Difficulty
Harder than Hard
1700m Elevation Gain
Duration
8-12 Hours
19-20km
Cascade Mountain is another classic mountain surrounding the town of Banff – its peaks are iconic and are probably in the background of countless memories. Another summit, another memory. This time, I started out fairly early. The trail head starts at Mount Norquay parking lot where in the winter it is a ski hill. In the summer, it is where most of the hiking takes place and it is common to drive up or take the bus there. I started a little later than planned – around 7:00AM and finished later than planned as well – around 6pm. I was not feeling the best and was going through a slight food poisoning so take this hike review with a grain of salt. I also took several long breaks and naps on my climb up and down.
The hike from the trail head to the base of the mountain is fairly simple, well marked and straight forward. Surrounded by dense forests and greenery, it is hard to make out any views of the mountains at all. As you pass a number of streams and rivers, eventually the steepness starts picking up and the road forks. On one side, the trail continues deeper into the valley where it reaches the end of a different hike: Cascade Amphitheatre. It is important you follow the other trail as it eventually will lead to the summit.
The path gets a lot steeper and eventually, the tree cover completely disappears and the views of the valley and the goal shows up. At this point, the trail also turns rocky, and is still well marked though not as obvious as before. The trail marks varies – from colorful flags on trees or branches, to painted rocks or tall cairns. Be mindful to closely follow these as it is easy to lose the trail – especially since the traverse turns into a boulder field. Personally, on the way down I had lost track of the path and gotten lost in this boulder field. I had to back track a fair ways up and waste some of my energy and time.
The views are unreal and as the hike progresses even further, some of the town of Banff and the amphitheater slowly comes into view. At this point, it is a hard and strenuous hike up to the mountain with astonishing views of the Rockies. The last kilometer before the summit push is a grueling scree with a small amount of scrambling at the top.
Recommendations
Make sure to use a hike app or map. It is quite easy to lose sight of the trail in the boulder field and in the dense forest especially as the path forks into other trails.
Wildlife: Did not see too many wildlife, other than the common birds and squirrels. However, Moose, Elk, deer, bears and more are known to be in the area of the national park.
Equipment: Hiking poles, proper foot gear, a head light for the dark when starting early/ending late, plenty of food and water.
19-20km, Out and Back – 1700m Elevation Gain
Photos from the Trail
Sulphur Mountain to Gondola
Location
Banff National Park
Town of Banff
Difficulty
Moderate
800m Elevation Gain
Duration
2-4 Hours
6-12 km
Sulphur mountain is one of the nearby mountain peaks in the town of Banff. Compared to its surrounding colleagues, this mountain is a lot shorter and smaller. However, there is a great pull towards this peak. First, it is one of the peaks; that in itself is enough to attract visitors and hikers alike. Second, the Sulphur Gondola is situated here and is an easy way for non-hikers to climb to the top; it goes without saying that this is one of the town’s main attractions. There is a great lodge at the top with a restaurant, cafe, and entertainment. Don’t get me started on the views.
To get up this mountain, many take the gondola. However, the price is a bit of a turn-off and there is a second way. This is the Sulphur Mountain hike. It starts at the parking lot of at the base and at the trailhead, it is a consistently uphill battle. It is not an overtly technical hike – the trail follows a well marked, well used dirt path all the way to the top. I did this hike in the winter in the late afternoon to catch the sunset. I don’t think there is any trail maintenance in the winter so be aware.
The views itself was fantastic. The trail starts at the base of the mountain covered by lush forests. There is no views at first but around halfway, the trees start to thin out. As the foliage opens up more, the view of Mount Rundle’s peaks and its back-side valley start to dominate the views. The trail is a seemingly never-ending switchbacks all the way to the top as you eventually follow the gondola trail. Unfortunately, the views doesn’t really change much until you get to the summit.
Fortunately, I was able to take the gondola down back into the parking lot. There are conflicting reports whether the gondola down is free or not. I have heard both sides and I am leaning towards that yes, it is free to go down. However, I can also see the possibility of a charge during the peak summer tourist season. Do your own research as this can affect your hiking plans.
Recommendations
Use of a map or an app is recommended but I would not worry about getting lost. It is well marked, very popular, and close to civilization.
Wildlife: Did not see too many wildlife, other than the common birds and squirrels. However, elk, deer, bears and more are known to be in the area of the national park.
Special Equipment: Hiking poles would be great.
Photos from the Trail
Tunnel Mountain
Location
Banff National Park
Town of Banff
Difficulty
Easy
270m Elevation Gain
Duration
0.5-2 Hours
4-5km
Joining the mountain giants around the town of Banff, is Tunnel Mountain – AKA the sleeping bison. Its shape and location is an iconic part of the town. It is easily accessible in town and always a walking distance away.
The trailhead can be accessed from many different parts of town but it truly starts at the road that goes around the mountain. I wouldn’t even call it a mountain – it is more of a hump of dirt, rock and trees really. However, this measly hump of dirt and rock is an iconic and historic part of the town. It offers great views of the surrounding area and beautiful views of the mountains.
The hike itself is easy – truth be told, finding parking at the trail head is the hardest part. It is very unofficial and there is very little space. I would highly recommend parking in town and walking to the trailhead. This adds another 10 minutes to the hike but I’m sure it is worth it for the views.
The hike is consistently uphill – especially the first parts. These parts are on a fairly steep dusty dirt trail. It eventually peters our to flatter sections with beautiful views of the surrounding magnificence. Many use this hike as a daily walking trail, it can get fairly crowded and busy. It is simply an easy hike that has a great reward. I would highly recommend climbing Tunnel Mountain as a great introduction to the town.
Recommendations
On a nice summer day, It is a great spot for a picnic. There are plenty of flat areas at the top.
Wildlife: Did not see too many wildlife, other than the common birds. However, Moose, Elk, deer, bears and more are known to be in the area of the national park.
Photos from the Trail
Corey Pass Loop + Mount Edith (2 summits)
Location
Banff National Park
Corey Pass Loop Trailhead
Difficulty
Hard
1400m Elevation Gain
Duration
6-10 hours
14km
Corey Pass Loop and the summits of Mount Edith is a great and fun trail for adventurous hikers. The views are breathtaking, the terrain are varied and the trail is relatively well marked and well used. Here you will experience some pretty challenging scrambling with some exposure. Mount Edith has three different “summits” and we only did the first two as the last one has got some seriously dangerous sections. The two summits are fun yet still challenging.
We did this hike in the peak of the fall season and it was absolutely gorgeous. A grove of larch trees stands as the first taste by the trail head and it soon leads you to start climbing a fairly steep trail through a dense forest. Soon after, the trail becomes a steep ridge up towards the mountains where the view completely clears as you pass the tree line. Here is where the fun starts as you make your way to the pass. Corey Pass is an absolute stunner as it gives you an amazing view of the mountains behind the steep walls of the Mount Edith. Here you can detour to try and conquer the summits where some pretty good scrambling is involved.
Moving forward from the pass, the trail follows a consistent decline behind the mountain pass and into new territory. The environment and views here were absolutely jaw-dropping. Eventually, you will find yourself entering another dense forest as you lose the elevation gained. After a long walk, you will find yourself back at the trail head.
Recommendations
Make sure to use a hike app or map. It is quite easy to lose sight of the trail in the boulder field and in the dense forest especially at the second half of the Corey Pass loop. There are other trails that lead deeper into the back country and deeper into the forest. Make sure you bring a battery with you or an offline map to make sure you’re right on track.
Wildlife: Did not see too many wildlife, other than the common birds. However, Moose, Elk, deer, bears and more are known to be in the area of the national park.
Equipment: Hiking poles, plenty of water and food(we were running very low after a long day), some sun cover as the pass have very little shade, hiking shoes, and perhaps a helmet for some falling rocks at the summit sections.
Photos from the Trail
Johnston Canyon + Ink Pots
Location
Banff National Park
Near the Town of Banff
Difficulty
Cake+Easy
500m Elevation Gain
Duration
0.5 – 2 Hours
11km
Another classic tourist heavy hitter: Johnston Canyon is an absolute favourite for visitors and for a good reason. The trail is very easy – I’d call it a cake walk. It is well marked, well visited and fairly safe. Most of the trail takes you in the canyon where visitors brave the winding path right above the rapids on metal walk ways. The views are amazing and it truly is a natural wonder and a great place to explore a canyon.
After visiting the handful of waterfalls in the canyon, many choose to double-back and head towards the parking lot. However, some choose to take the path at the upper waterfalls towards the Ink pots. The trail leads you to a decently steep dirt path through a forest. It is fairly boring in my opinion in this section of trail but being deep in the forest can lead to some nature interaction and potential animal sightings.
Finally, the forest starts to disperse a little bit and hikers make their way to a valley with some very picturesque “ponds” and stream. These ponds are famous for its tranquil beauty and colour. Its also hard to complain about the great views of the mountains all around.
This one is very popular especially the Canyon. This is unfortunately to its detriment. It can sometimes get too crowded and the experience is just unpleasant. Still, I would highly recommend at the very least checking out the canyon for those hikers looking for an easy day.
Recommendations
The path is well marked and well visited. Be careful not to fall into the canyon. Hold the hand rails and follow instructions. Make sure you come early and not during the peak times as it can get insanely crowded and busy. There are numerous large parking lots at the trail head so make sure you get a spot there!
Wildlife: Did not see too many wildlife, other than the common birds and squirrels. However, Moose, Elk, deer, bears and more are known to be in the area of the national park.
Equipment: Normal, regular hiking attire would suffice. I would recommend bringing some food and water for the Ink pots – its a great place to take a long break or lunch in. There are plenty of places to sit and enjoy life.
Photos from the Trail
Middle Sister Summit
Location
Canmore
Town of Canmore
Difficulty
Hard
1500m Elevation Gain
Duration
6-8 Hours
16-17km
The iconic sisters are a staple to Canmore‘s sky line; all three summits are possible and in this section we will talk about the easiest: the middle sister. Out of the three it is the easiest however make no mistake; this is still a hard and strenuous hike. The first sister includes some belaying, actual rock climbing and dangerous exposures whilst the eldest sister can only be reached from gravel back country roads. The middle sister is accessible from a trail head that is just off the main roads of Canmore.
This is actually one of my favourite hikes in the area. Actually climbing an iconic view that can be seen everywhere in the town has such a satisfying effect. Me and my two other friends decided to tackle this one.
We started dark and early – at around 5:30am in a warm autumn day. It was still dark out and we were following the stars (and the trail) to the summit. We even saw starlink making its rounds and I learned a bunch about constellations that early morning. The trail is fairly simple – it starts off at a pretty wide, boring dirt path. Soon after, the trail turns into a rocky path as we started following a gulley to the top. Here, there are many many different rocks of all types and shapes. Here, the trail also starts to significantly incline. The boulders in the path also provides an extra challenge and climbing effort.
It did not take long for the sun to start shining and we could start to see what we signed up for. As the towering sisters loomed infront of us, rocks and boulders surrounded us from all sides. The trail is straightforward enough and eventually, the gulley ends and a medium scree ascent starts. I say medium because this scree is made of innumerable medium-sized rocks. It is hard to sink into it but it is definitely big enough to cause some damage to the soles of your feet.
At this point the views are immaculate and as we made our way to the middle sister, the path clears and it is a semi-scramble to the top. It is still quite a ways and still is a lot of elevation to cover but it is pretty straight forward at this point. There is even a well-marked and well worn trail to guide you to the goal.
The hike is strenuous as it is a constant ascent from the bottom to the top. The views are amazing. The achievement unforgettable.
Recommendations
Make sure to use a hike app or map. It is quite easy to lose sight of the trail in the boulder field and in the dense forest. There is decent cell coverage as it is right next to the town but it can be a bit spotty at times. Since you will be traversing through countless jagged rocks, I would recommend hiking shoes with great sole protection.
Wildlife: Did not see too many wildlife, other than the common birds. However, Moose, Elk, deer, bears and more are known to be in the area of the national park.
Equipment: Hiking poles, Hiking shoes, Water and food, Flashlights if hiking in the dark.
Photos from the Trail
Devil’s Thumb (Thru Lake Agnes)
Location
Banff National Park
Lake Louise Area
Difficulty
Hard
1000m Elevation Gain
Duration
6-8 Hours
12 km
Lake Louise is an extremely popular spot in Banff National Park – it does not come as a surprise as the area is just jaw dropping. Aside from amazing views, it is also home to trails that leads further up and into the mountains. One of the most popular trails is the Lake Agnes trail up to the tea hut. It is well marked and well used. Most of the hikers stop at the top by the lake but there are also several trails that head further in. One of these trails goes to the Devil’s Thumb. The peak is visible from the tea hut and I would absolutely recommend pushing on through to this last section.
At the tea hut, hike further down into the basin – follow the lake all around. Finally, a switch-back dirt trail going up into a pass can be seen up into another lookout called the big bee hive. At the top of the pass, turn left for the beehive, turn right for Devil’s Thumb. It is fairly well marked and well treaded but if you’re not sure, try asking others on the trail or keeping a close eye on your map. Follow the Devil’s Thumb route, you will find yourself hugging close on a steep side of the mountain where the view changes to a the plains glacier valley. Follow the dirt path and it will eventually climb steepily. So steep in fact that some scrambling is required. I would not recommend doing this part in the rain as slipping, landslides or rock fall can occur. Even when dry, this section is very steep and the steep dirt path can easily errode under your feet. This part and the fact that it is quite a long trail earns its “Hard” rating.
After the perilous steep dirt path, huge boulders start to get in your way. Keep climbing over these and following the trail and you will eventually find yourself at the peak of Devil’s Thumb – a relatively flat section with flat boulders making up the “thumb”. This spot is great for relaxing, resting, picnics, and taking in the views of both Lake Agnes and Lake Louise. It is an extremely rewarding hike and is justifiably popular amongst hikers.
Recommendations
Make sure to use a hike app or map. Trekking poles would be great here especially on the steep climb up and down the dirt path for safety and efficient hiking. I would also recommend proper hiking shoes as sufficient grip is essential. Make sure you carry enough food and water – you can always take a tea break at the hut. Watch out for horse poo as horses are on the trail to Lake Agnes during the summer months. It can also get really really crowded during the peak seasons.
Wildlife: Did not see too many wildlife, other than the common birds. However, Moose, Elk, deer, bears and more are known to be in the area of the national park.
Equipment: Hiking poles, Proper shoes, Enough food and water.
Photos from the Trail
Tower of Babel
Location
Banff National Park
Moraine Lake Area
Difficulty
Hard
400m Elevation Gain
Duration
2-4 Hours
3.4km
Don’t let the statistics fool you. These 3.4 kilometers of 400 meters Elevation gain is no joke. The first and hardest hurdle to overcome: actually getting to the trail head. Back in my day, the road up to the parking lot was publicly open and as long as there are spots open, one can drive up to the lot of Moraine Lake and competition for spots in the summer was ruthless. However, things have changed and this road has turned private. Only approved businesses and companies can access this road and transport people to this area. This means higher costs and further planning is required.
The second hardest thing is the actual hike itself. The Tower of Babel can be seen from the parking lot and the “trail head” can be found by going through the forest to the left and towards a rock “garden”. This trail head is not really official nor is the path. I would highly highly recommend having a trustworthy guide/map to find your path up the tower. It also takes a fair bit of trail-finding skills. There isn’t really a trail but instead, it is more of a destination to try and figure out how to get to.
After you’ve found your trail and your designated path, its time to actually climb the damn thing. Its full of countless large and medium sized boulders at first as the path immediately becomes super steep. Right from the start all the way to the end, climbing up the tower is a strenuous torture. Expect to scramble on all fours for the entire time. There is a little bit of rock climbing with some exposure at the end. It is a highly rewarding but very hard hike. It offers a different perspective to the world-famous Moraine Lake with some fun and challenging scramble up a boulder scree.
Recommendations
Make sure to use a hike app or map. It is quite easy to lose sight of the trail in the boulder field. A helmet is recommended especially if it is busy and there are others above you. There are possible rock fall and some experienced hiking is necessary before tackling this hike.
The hike down was really fun. I did this in late spring and there was noone else but my group tackling this beast. I “ski”d down for most of the whole way down as it was mostly scree. It is a fun, short but challenging and dangerous hike.
Wildlife: Did not see too many wildlife, other than the common birds. However, Moose, Elk, deer, bears and more are known to be in the area of the national park.
Equipment: Hiking poles, Helmet, Gloves,
Photos from the Trail
Sentinel’s Pass
Location
Banff National Park
Lake Moraine Area
Difficulty
Intermediate
800m Elevation Gain
Duration
4-6 hours
12km
Sentinel’s Pass is one of my favourite all-time hikes in the Rockies. I’ve done it a handful of times and each time my love for the hike is further cemented. It has got everything – an initial view of the magnificent Lake Moraine, a hike in the forest, incredible jaw dropping views up to the pass and a well-marked trail. The whole way up, one follows a well-trodden path. It is hard to miss especially if you follow the consistent stream of other hikers there with you. I have done this hike in both the summer and fall seasons and I must say the autumn takes the cake. It is no surprise that this hike is extremely popular during this time of the year.
After the Lake Moraine, you start to climb up a dense forest with many switchbacks. At the end, it turns into a plateau full of golden larches with a stream to the side. As you climb farther up, the plateau opens up and the valley unfolds itself in front of you giving way to an open sky view of the mountains and glaciers surrounding the area. In this valley sits two separate lakes with their own distinct colours. Follow the trail up towards more rocky switchbacks and finally to the summit of the pass where you can choose to stay and have a nice lunch or go further and attempt to tackle the summits nearby.
This pass is special to me as it is one of the first full hikes I have done on my own here in the Rockies. The sheer beauty and surprise of the views on the other side of the pass is unforgettable.
This hike comes highly highly recommended. It does not require any special skill – just the willingness to climb 800m and 6km. I don’t think it is especially difficult; the only hard thing about this hike is now finding your way to get here as the road to Lake Moraine has gotten much more limited throughout the years. Through all the hardships however, this hike is absolutely worth it. I love this place, this hike, these mountains, these lakes and the memories here.
Recommendations
Use of a map or gps is only slightly recommend according to the conditions.. The trail is well marked and well used.
Wildlife: Did not see too many wildlife, other than the common birds and critters. However, Moose, Elk, deer, bears and more are known to be in the area of the national park.
Equipment: Hiking poles and shoes, camera, water, food for a picnic,
Photos from the Trail
Bow Lake Falls
Location
Banff National Park
North of Lake Louise
Difficulty
Moderate
290m Elevation Gain
Duration
3-4 hours
9km
NOTE: The trail may or may not be partially closed due to safety issues. There was a tragic rockfall incident occurring here recently. Be aware.
Another classic hits the books – one of my favourite hikes. Very family-friendly yet still a bit of a work out. The trail starts at Bow Lake which incidentally is the source of the iconic Bow River. This river runs through the town of Banff, Canmore, the city of Calgary and all the way to the Hudson Bay. There is a pretty big parking lot by the The Lodge but watch out this can easily overfill during busy times. I would recommend getting here early and securing your spot. As previously mentioned, there is actually a lodging place here where people can spend the night. Personally I haven’t stayed here myself but I have visited the gift shop downstairs and they have some really cool stuff. Park’s Canada also sometimes hold educational presentations by the lodge.
Let’s get started with the hike – the trail starts at the parking lot and follows the edge of the lake. The views are absolutely breathtaking as the lake offers an undisturbed look at all the giant behemoths all around. The trail is well used and mostly flat. There are sections where it goes into the forest for a little bit but it usually comes back out onto the edge of the lake. There are times when it can get a bit muddy and thin so take care during busy times.
Eventually, the lake ends and the hiking path follows the source – a river bed mouth(s) on a field of glacier rocks. Follow these river beds and the cairns showing the way onto some pretty nice waterfalling through rocks. These rocks have been carved out by the water for countless of years and it truly shows by the cool curves and shapes. You’ll know what I mean when you see it.
This is the first time the trail truly ascends. It is a pretty relentless uphill battle up to the point where you climb up some man-made steps on the edge of a hill looking down on the glacier river to the side. The uphill battle peters out here and there and the view disappears as the trail takes you further in to the forest. A fork on the trail shows up in the form of a giant boulder bridging the gap of the river. It is a cool spot to be in but make sure not to go on to the boulder and cross the river as this actually is a different path up towards a cabin(!) at the plateau where the waterfalls start.
Don’t stray from the path and keep heading straight. Eventually, the forest ends and another “valley” unfolds. Small glimpses of the waterfalls can be seen throughout the hike but only really up to this point does one get a clear view and hear the waterfalls. It is a sobering and peaceful moment each time to see and hear it for the first time. At this point the trail loosely follows the river from the waterfall and the rocky gulley that surrounds it.
In the past, my absolute favourite thing to do here is to climb higher up to the waterfall basin. Getting close and personal to the waterfalls as much as possible without getting drenched is an extremely thrilling yet calming thing to do. However, recently on June 19 2025, there was a fatal and tragic rockfall here. It just goes to show how risky and scary things can quickly be.
I have hiked this trail more than a handful times in all seasons. Every time is an absolute treat. It was accessible during all seasons however during the winter time, I was unable to reach the waterfalls. BUT! The cool thing during the winter is the ability to walk on the frozen lake at the start. It was a surreal experience. Read more about that here!
Recommendations
Follow the signs of the area! There may be some parts of the trail closed to the public. Use of a map or gps is only slightly recommend according to the conditions.. The trail is well marked and well used.
Wildlife: Did not see too many wildlife, other than the common birds and critters. However, Moose, Elk, deer, bears and more are known to be in the area of the national park.
Equipment: Hiking poles and shoes, camera, water, food for a picnic,
Photos from the Trail
Lake Agnes + Big Bee Hive
Location
Banff National Park
Lake Louise
Difficulty
Intermediate
750m Elevation Gain
Duration
4-6 hours
11km
This one is a very popular hike – it is undoubtedly one of the most crowded hiking trails in the National Park especially in the summer. It goes without saying since Lake Louise is just right around the corner. The trail head actually starts at Lake Louise and the first challenge is finding a parking spot. There are a lot of parking available but there is also A LOT of cars looking for a spot. To avoid a terrible headache, I would just really recommend to arrive in the god-forsaken early hours.
Now that finding parking is over, we can get to the good part – the actual hike itself. Make your way out of the parking lot and onto the first highlight. The view of Lake Louise is iconic and beautiful. There is a good reason why it is so popular. Don’t linger though as it can quickly get very crowded. Make your way around the lake towards the mountains and the forest. The trail is well marked, plenty of signage and well used. It is hard to get lost and miss the trail.
The trail is mostly dirt paths with some rock here and there. There are also a lot of switchbacks. Another thing of note is that during the summer, there are horses that walk along the trail so do make sure to avoid the horse poop littering the path! Your hiking shoes will thank me later.
The views disappear for a little bit as you make your way up the dirt switch backs and deeper into the forest – however, nice glimpses do show up here and there. The next highlight is a quick stop at the bottom of the big bee hive. Here mirror lake sits and is a great spot to chill at where one can have a great view of the big bee hive.
Further along the trail, plenty of interesting things can be found. A horse stable where the horses are tied to and rest and a small waterfall are one of the last things you’ll see before a man-made staircase. This staircase will lead you to the Lake Agnes Tea House. Personally, I think its a bit overpriced but it is a really cool spot – there are plenty of places to hang out here and benches to sit at and it is free and there is absolutely no pressure to buy anything.
This is where most of the hikers stop – at Lake Agnes. The views here are also just as amazing with some of Lake Louise in view. Don’t stop here as this is just the halfway point. At the very least, I would highly recommend following the glacial rocks around the lake. There is still a trail but it is smaller and less obvious. It is less crowded and will still have the amazing views.
*note: I hiked here during the early spring and there was still plenty of snow at the base and at the slopes of the mountains. There is definitely some avalanche risk here during these conditions.
After walking around the lake, the trail ends at a fairly steep hill where switchbacks take you further up. These are fairly tough especially since at this point of the hike, there have already been a fair bit of elevation gain and hiking action. Get through these switch backs and a fork enters the trail. The path to the right will lead to Devil’s Thumb which is also a fantastic hike. However, for this section, you will be taking the path to the left. There is a trail but it may be harder to find as it could be overgrown or covered. However, it is popular enough that you will definitely see some fellow hikers. Follow the trail and you will end up at the end of the big bee hive – on top of the big boulder. There is a really nice view point perched at the tip. A gazebo serves as a great resting spot for a lunch, a picnic or just some shelter. The views of the surrounding area is awesome. A unique view of the lakes and the iconic chalet can be seen. It is a really rewarding prize and the end of a long day.
Recommendations
Use of a map or gps is only slightly recommend according to the conditions.. The trail is well marked and well used. There are some sections at the latter part which sees less use and therefore can be a bit harder to follow. Do watch out for seasonal conditions, avalanche risks etc.
Wildlife: Did not see too many wildlife, other than the common birds, squirrels and critters. However, Moose, Elk, deer, bears and more are known to be in the area of the national park. Especially here where there is a lot of human activity. There have been sightings of black bears by the chalet.
Equipment: Hiking poles and shoes, camera, water, food for a picnic. Some cash for the tea house.
Photos from the Trail
Heart Creek Bunker
Location
Bow Valley Wildland Provincial Park
Near Canmore
Difficulty
Cake
220m Elevation Gain
Duration
30-45 Mins
4km
Heart Creek Bunker is a very unique find here in the Canadian Rockies. As the name suggests, it is a Cold War era bunker near Heart Creek. The trail head is a little hard to find but with some good googling, it should be pretty easy. Here is the link anyways 😉 It is a pretty popular spot as there are a handful of things to see here. There is ample space to park and it does not get too crowded.
The trail is well worn and pretty easy to spot and follow. It is a relatively flat dirt path towards the bunker. There is some nice views of the surrounding areas but nothing crazy. The real highlight is the bunker – it unexpectedly pops out of view as soon as you get near it and it is extremely unique and cool to visit. I would highly recommend bringing flash lights, head lamps or any other source of light as it can get very dark inside. There is ample space within but the darkness can be quite eerie.
I would also recommend bringing along a light layer on top of your hiking clothes if you will be spending an extended amount of time exploring the bunker. Since it is bored deep into the mountain, it is significantly colder than the outside – especially during the hot summer months.
I would highly recommend giving this place a quick check. The hike to it is not hard at all and it is really cool to see.
Recommendations
Use of a map or gps is only slightly recommend according to the conditions.. The trail is well marked and well used. Do bring good sources of light such as flashlights, head lamps etc. as the bunker gets really dark. Bring a light jacket to layer up if spending an extended period of time within the bunker as the bunker is colder.
Wildlife: Did not see too many wildlife, other than the common birds and critters. However, Moose, Elk, deer, bears and more are known to be in the area of the national park.
Equipment: Flashlights, head lamps, sources of lights. Light jacket for the summer. A camera, water. Some light snacks.
Photos from the Trail
Mt Jimmy Simpson
Location
Banff National Park
Bow Lake
Difficulty
Hard
1174m Elevation Gain
Duration
6-8 hours
15km
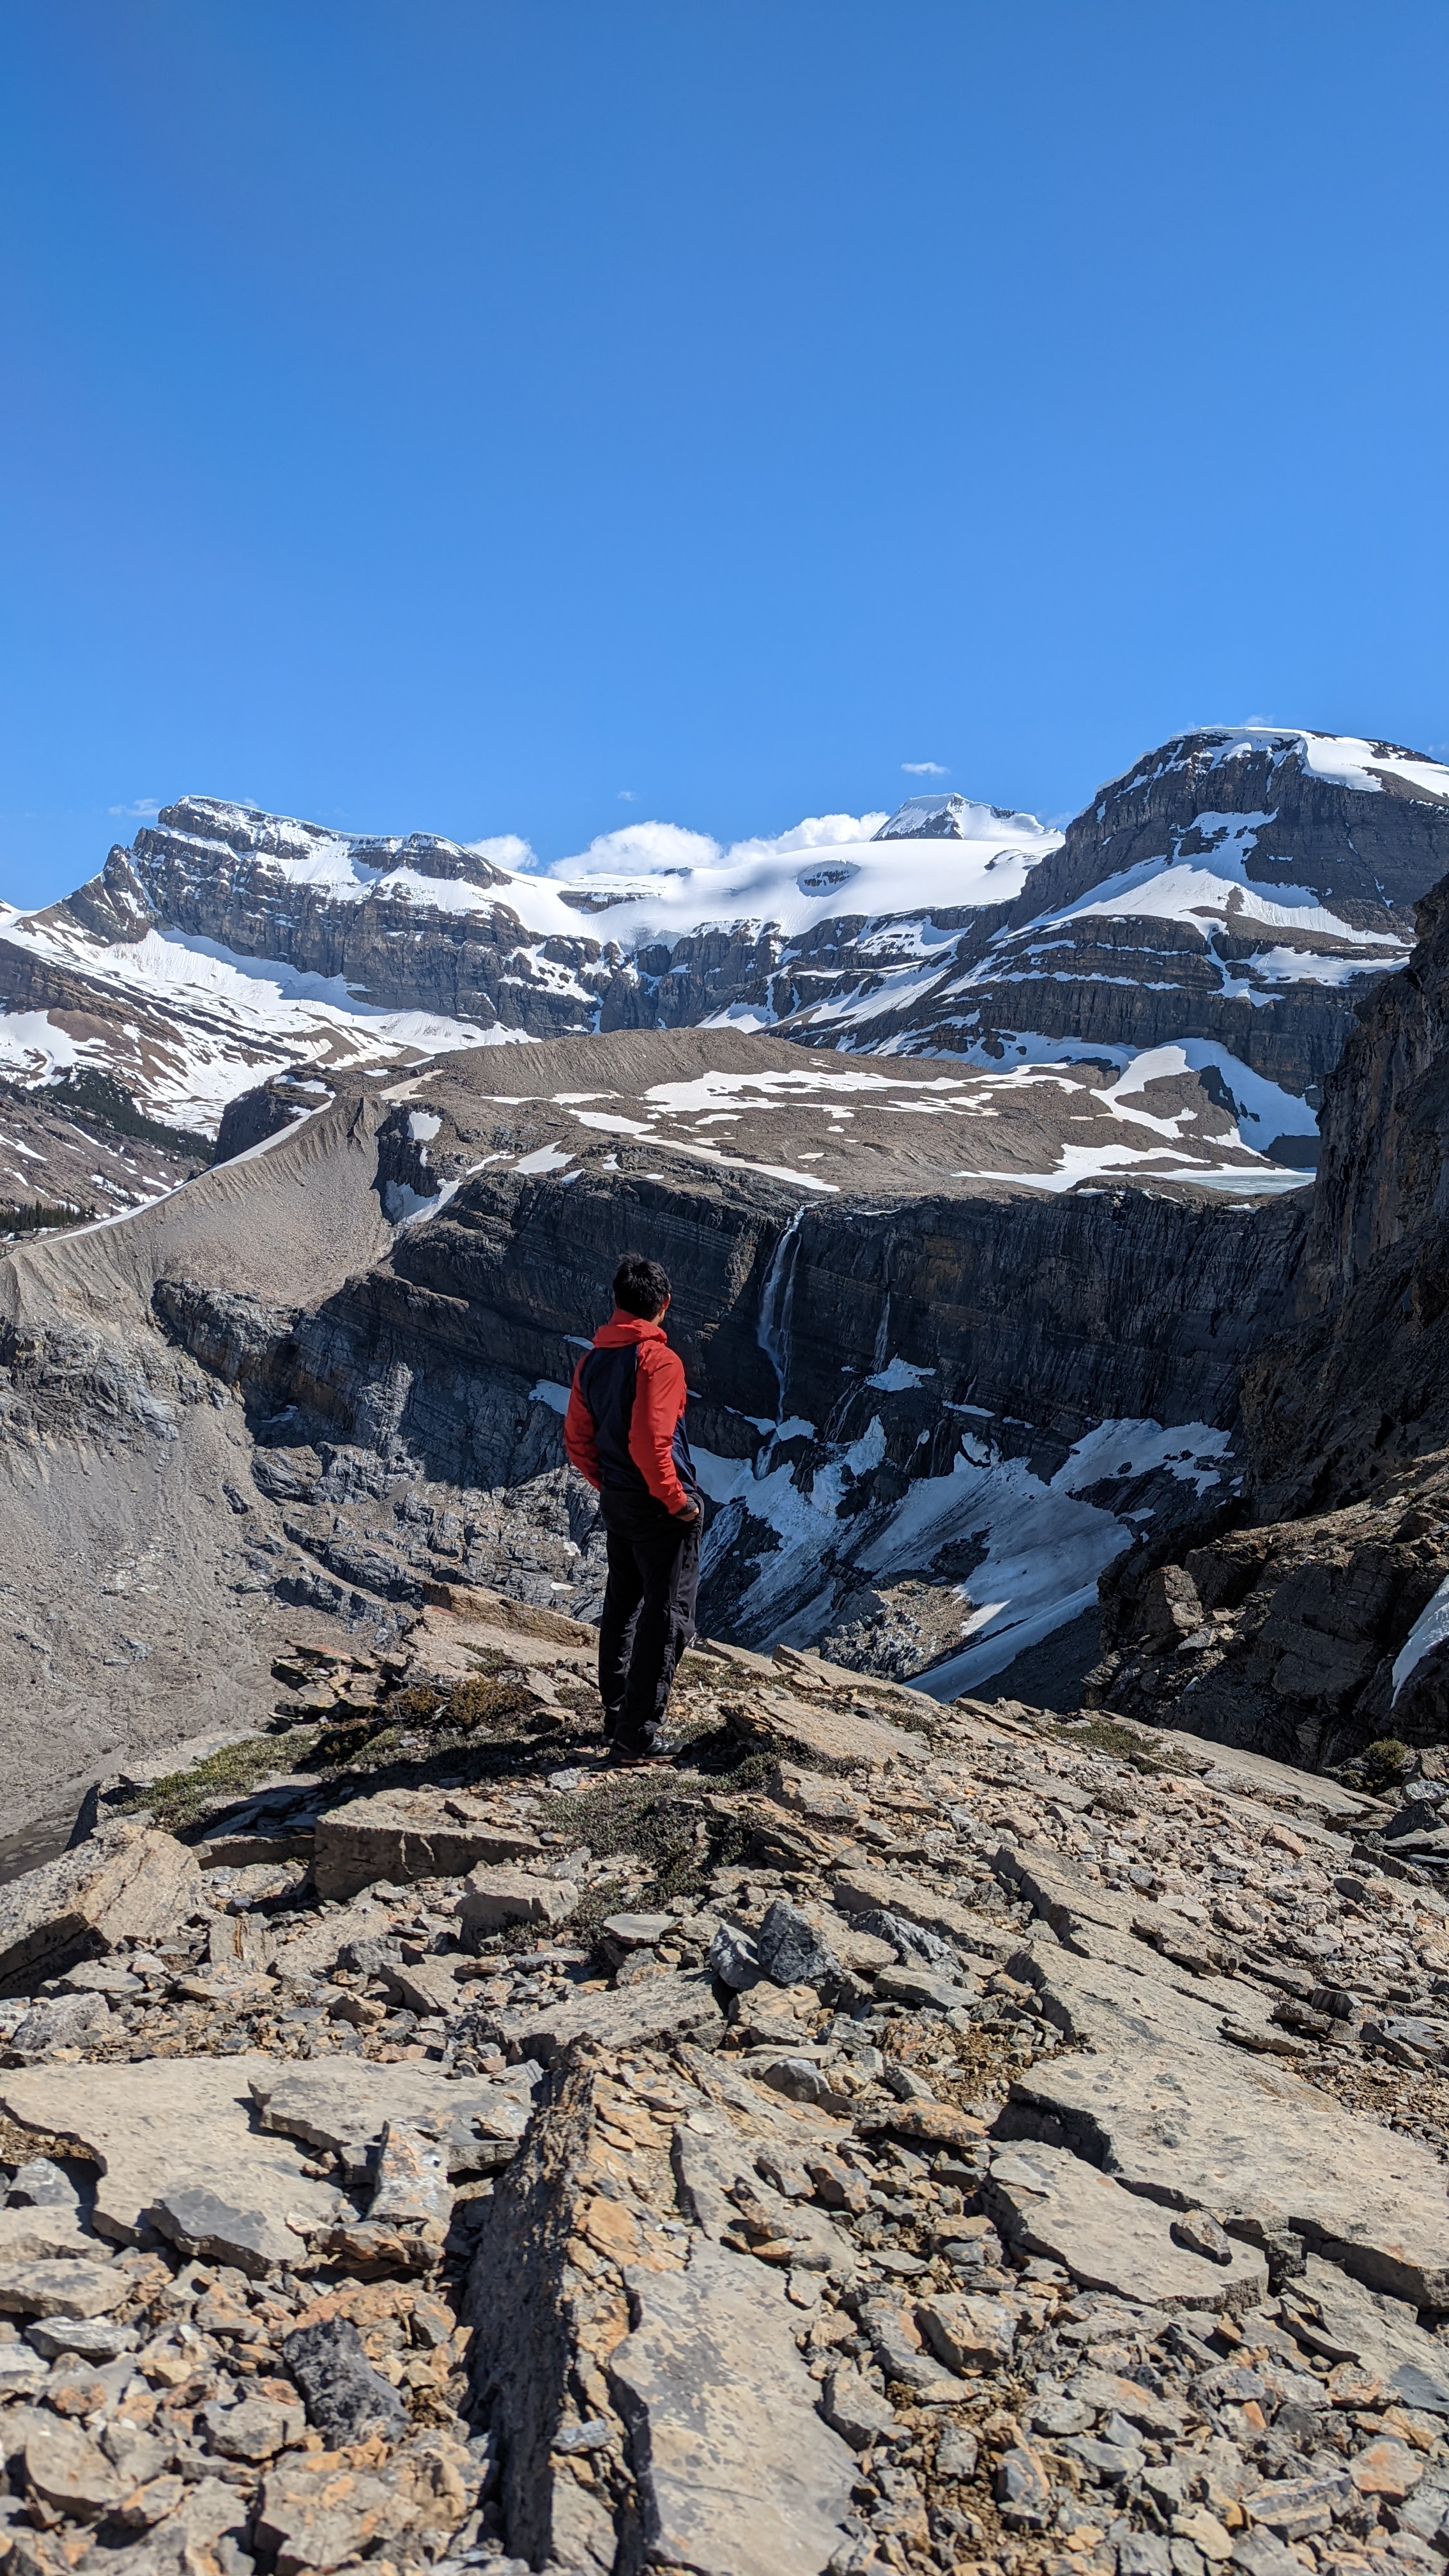
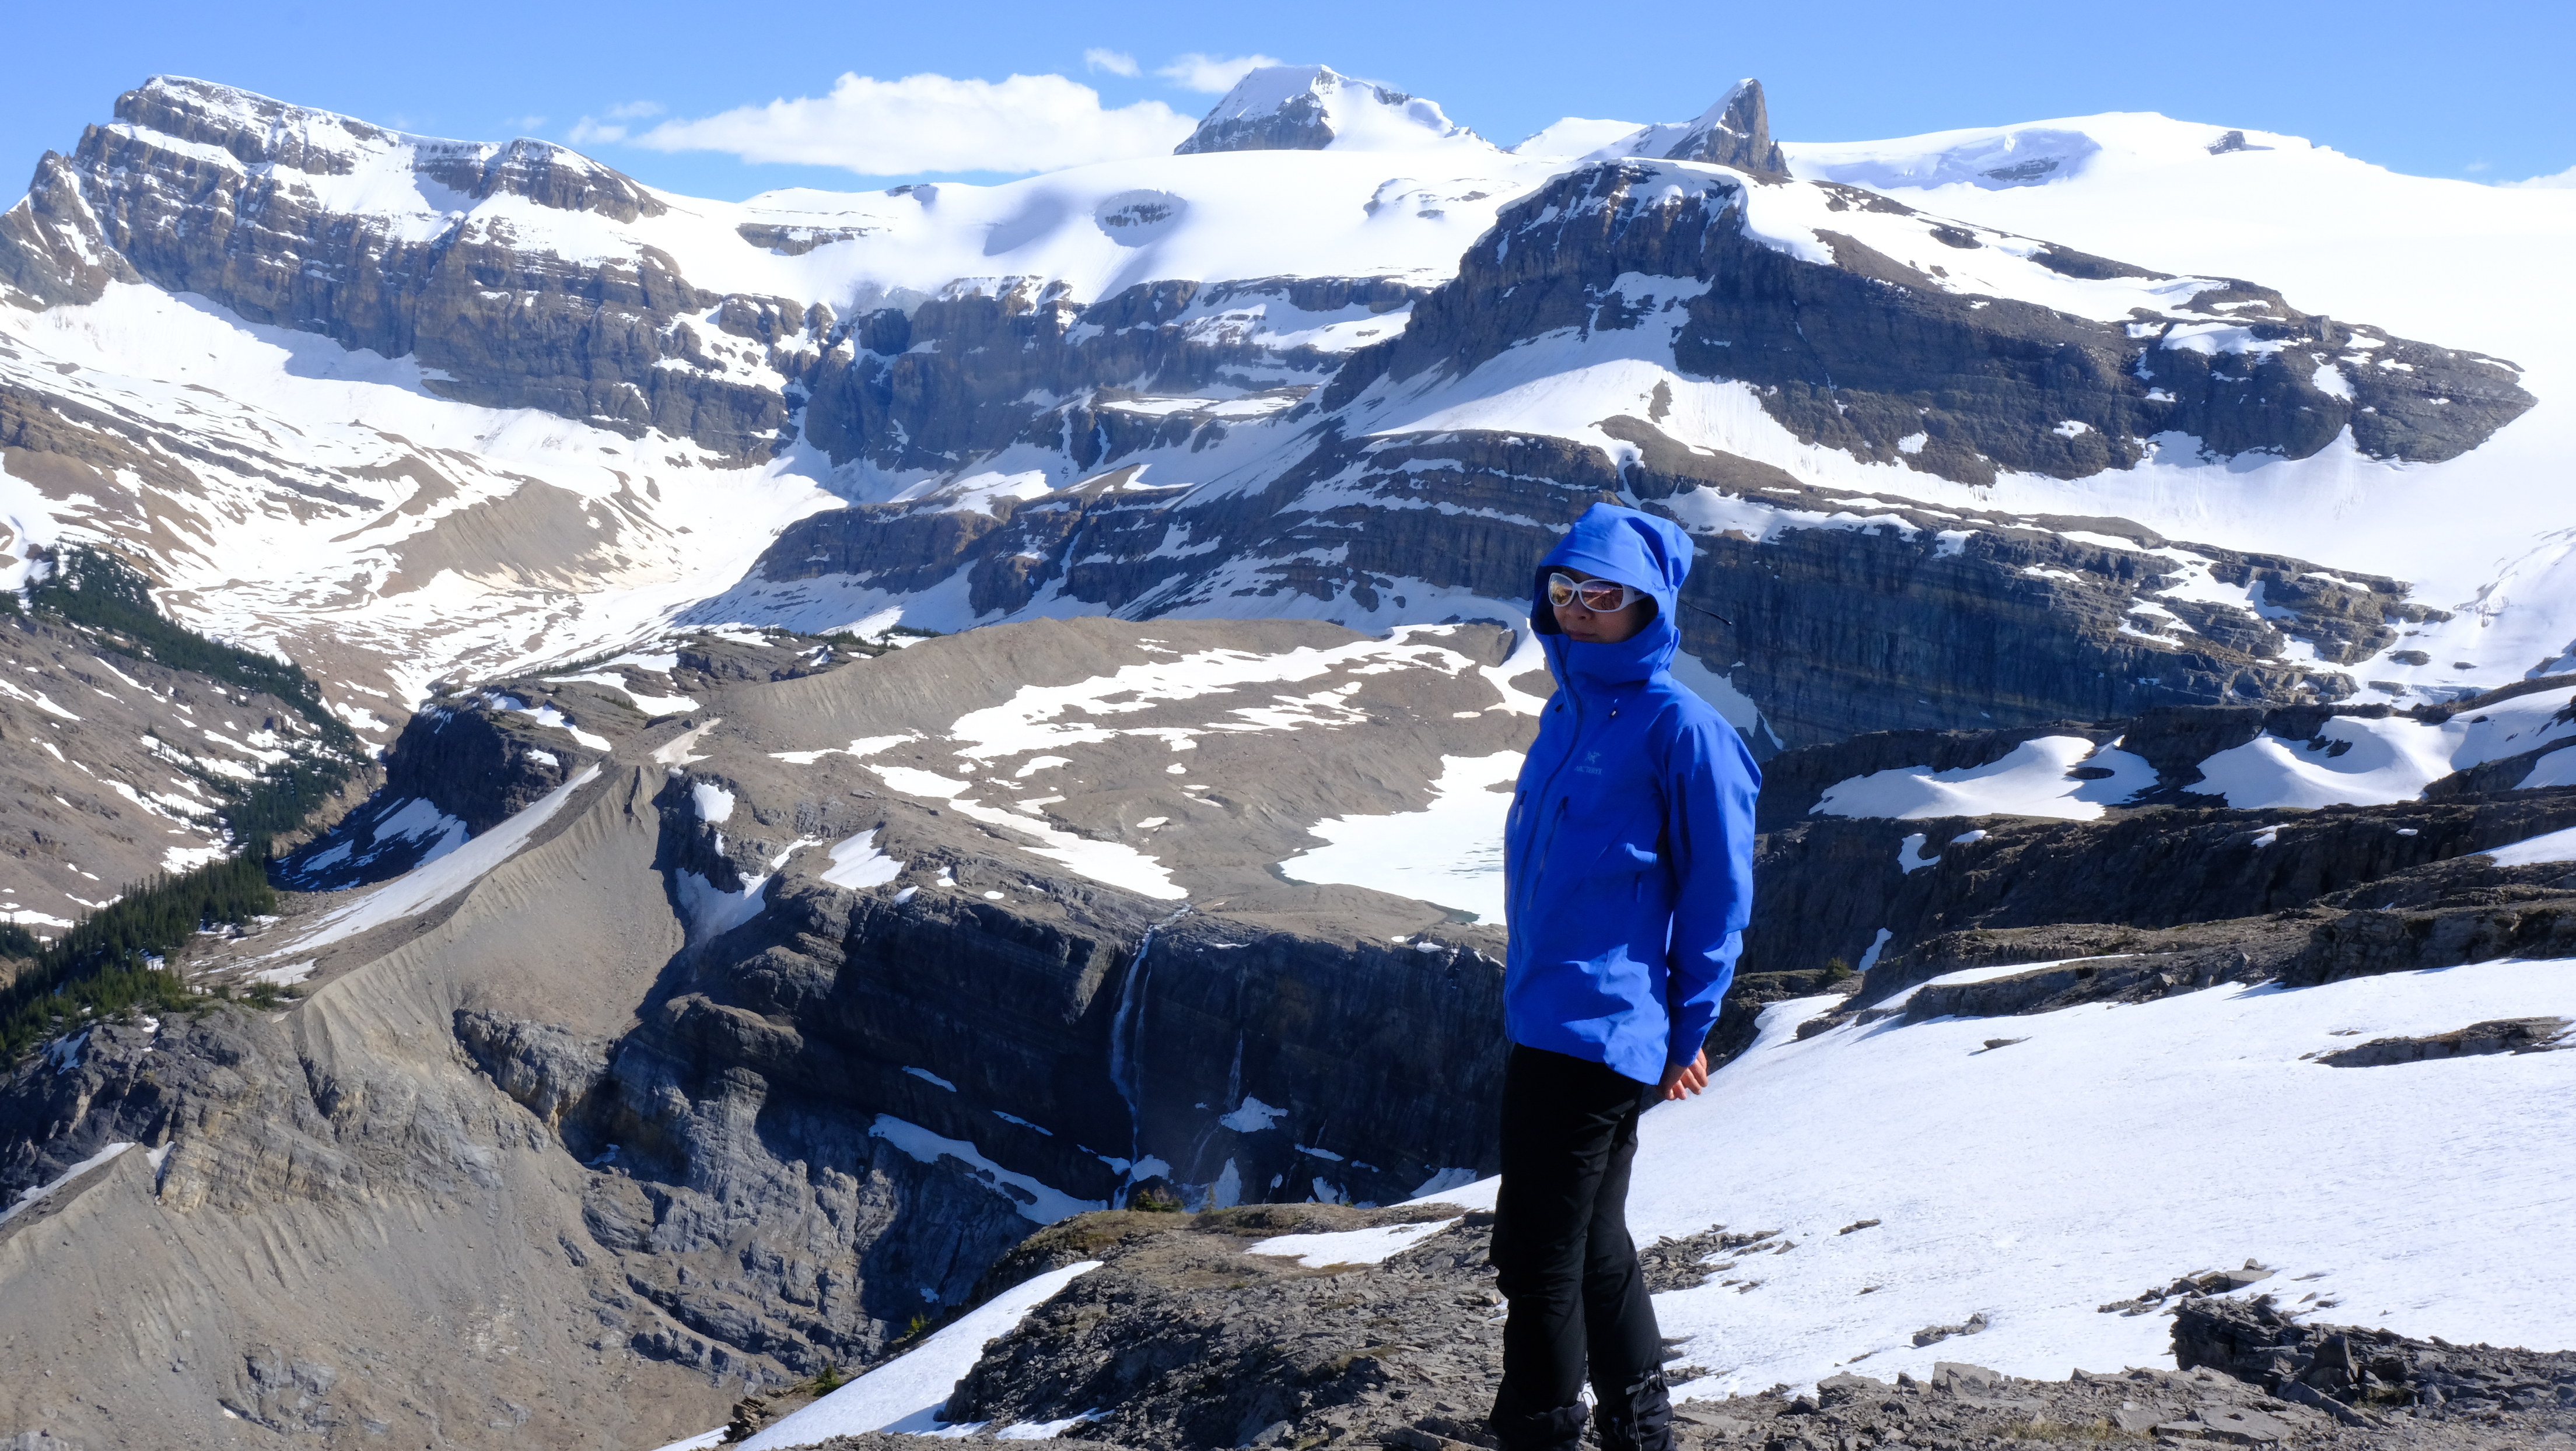
As one of the giants dotting the breath taking views of Bow Lake, Mt Jimmy Simpson is one for the books. Hikers looking to attempt this hike needs experience, proper gear and the athletic health. Experience because this hike is not for the faint hearted – a majority of the “trail” is very easy to lose and great trail-finding skills are required to traverse up to the peak. During my attempt, I don’t think we even managed to get up to the peak. I would also highly recommend proper gear due to the nature of the trail – boulders and rocks must be traversed and proper footwear and tools are required. There are also some scrambling involved. It’s relentless steep ascent is also something to consider – I would make sure to be mentally and physically prepared for this hike.
The trail starts at Bow Lake – don’t linger for the beautiful views here too long as you’ve got a long day ahead of you. Follow the pleasant trail to the Bow Glacier Falls. Instead of hiking to the base of the waterfalls, hang a right. This is where the fun begins. The path is a bit hard to find but follow the Alltrails map and you’re soon on your way up the mountain. Make sure you have a device (cellphone) that has an accurate GPS to keep on track with the map. Once found, the trail itself is pretty obvious to follow but can quickly disappear and reappear. This is where trail-finding is key. It is a relentless push to the top crossing a boulder field, fields of scree and some waterfalls.
There isn’t much direction I can write here to help with the hike as we heavily relied on the All Trails map as well. All the help I can provide is just the comfort and assurance that it is all worth it. The views at the top were jaw dropping. I may even go as far as to say that the views up here were one of the best (at least top 3!) views I have ever seen in the Canadian Rockies.
Recommendations
Use of a map or gps is only highly recommend. The trail is not well marked or well used. There may also be some snow-pack crossings.
Wildlife: I had an interesting but unconfirmed sighting of what we think was a wolverine during this hike. The reason why it is unconfirmed was because I was a fair bit far away but the shape, movement and tracks I saw leads me to believe this was it. It also made sense since they are found in these areas as well albeit very rarely.
Equipment: GPS and map. Battery bank for GPS. Hiking poles and proper hiking shoes, camera, water, and plenty of food. For a sunny day, I would highly recommend bringing some shades and some head covering as there are hardly any sun-coverage during the hike.
All Trails Link: Mount Jimmy Simpson, Alberta, Canada – 386 Reviews, Map | AllTrails
Photos from the Trail
Peyto Lake View Point
Location
Banff National Park
Peyto Lake
Difficulty
Cake
70m Elevation Gain
Duration
15-30 mins
1.5km
Peyto Lake‘s unique overlook view is world-famous. On a clear day, nothing beats it. The national park have been working very hard throughout the years to provide an easy access with ample parking. I’m happy to say that they have succeeded. The new parking lot and trail is great and very accessible and family friendly. From the parking lot, it is a very relaxing and wide board walk deep in the canopies of the forest to the magnificent view.
There isn’t really much else to say about this one. There great parking with ample space, it is easily accessed through the road and the board walk is very easy. The reward is even better – the jaw-dropping views of Peyto Lake is out of this world. At the view point there are also a lot of chairs, benches and places to chill at. I would highly recommend going here especially for families, children and a casual stroll
Recommendations
Equipment: Camera, water, food for a picnic.
All Trails Link :Peyto Lake Viewpoint, Alberta, Canada – 2,306 Reviews, Map | AllTrails
Photos from the Trail
Kinglet Lake
Location
Kootenay Plains Ecological Reserve
Saskatchewan River Crossing
Difficulty
Intermediate
800m Elevation Gain
Duration
3-6 hours
10.5km
Kinglet Lake is a bit of a “shoe-in” on this list. While technically it isn’t part of the National Parks, I added it here as it is still within the rockies. I have hiked here twice and the last time was during a group hike with my friends for some good ‘ol back country camping. I would say the difficulty definitely increases by a lot due to lugging all the camping gear on our backs. It is a very nice trail otherwise with a consistent uphill ascent. The end goal is Kinglet Lake which is a nice lake situated at the base of some mountains. What drew us in here was the fact that it was legal and free to camp here.
The trail starts on the road. There is not really a parking lot which is a bit of a shame. It is more of an unofficial trail head. There is simply a big shoulder on the side of the road where cars can park. The trail quickly starts to ascend through a nice mature forest. The path is wide, and the dirt is well worn.
The dense forest hides all the views but climb high enough and it eventually clears into this really nice clearing on the side of the mountain where some beautiful views are to be had. There are some boulders here and there and the path is hard to miss. Keep following the trail and you’d eventually find yourself once again deep into another forest and some stream crossings. The hike itself isn’t anything to write home about as it is pretty straightforward.
Eventually, you reach the Kinglet Lake where numerous makeshift camps are already set up by those camping here during the past. This part is actually pretty neat as there are some great camping spots here by the lake.
The trail actually goes further and beyond as there is a loop that goes to the summit of the mountain and back to the lake. I had done this on my first round and got carelessly lost on the way down. The views were great but my experience getting lost was not. Read about it here.
I would honesty just recommend hiking up here if you’re in the area or if you’re looking for a legal and free place to camp. The campsites were the highlight especially since it can sometimes be very hard to find a campsite in the national parks.
Recommendations
Use of a map or gps is only highly recommend according to the conditions.. The trail is well used but there is still a possibility of getting lost.
Wildlife: Did not see too many wildlife, other than the common birds and critters. However, Moose, Elk, deer, bears and more are known to be in the area of the national park.
Equipment: Hiking poles and shoes, camera, water, food for a picnic. Camping gear etc.
All Trails Link : Kinglet Lake, Alberta, Canada – 378 Reviews, Map | AllTrails
Photos from the Trail
Bow Falls + Surprise Corner
Location
Banff National Park
Town of Banff
Difficulty
Easy
70m Elevation Gain
Duration
0.5-1 hours
5km
If you’re visiting the town of Banff and are looking for a nice stroll amidst all the nature, I would highly recommend doing these two view points. I combined both of these into one section because they are related in a way. One takes you above the bow falls with an amazing view of the iconic Fairmont. Both follow the river and the other takes you to the base of the falls. The walk itself is not hard at all. There are some steep sections but these are short and sweet. There are also some staircases following the trail up the river.
Recommendations
The trail is well marked and well used. Very popular amongst visitors.
Wildlife: I have seen my fair share of deer and elk in this area. One of my fondest wildlife sightings here were during the fall, a whole herd of elk crossed the river together.
Equipment: No real equipment required or recommended.
All Trails Link: Bow Falls Viewpoint, Alberta, Canada – 2,996 Reviews, Map | AllTrails Explore Surprise Corner | AllTrails
Photos from the Trail
Jasper National Park
Wilcox Pass
Location
Jasper National Park
Icefields Parkway
Difficulty
Sweaty
420m Elevation Gain
Duration
3-4 hours
12km
Just right before the famous Athabasca Glacier, is the trail head for Wilcox’s Pass. Its a small dirt parking lot but there are plenty of spaces to park your car. However, it can get pretty popular so I would suggest going a bit early. From this point, the trail takes you into the forest as you ascend to the pass. It’s a pretty straightforward trail with some curving paths here and there. The ascent is pretty gradual and at a pleasant steepness level – not flat and boring but not too hard neither; just enough to give you a good sweat.
Shortly after starting the hike, the forest disappears and the views of the surrounding peaks and glaciers fill the sky. To the left, the Athabasca glacier is in permanent view while the surrounding directions are full of jaggedy mountains. The forest clears and suddenly, the trail opens up to a valley of rocks – it follows a cascading stream from the lake at the valley above. Keep ascending and it all really opens up as you arrive at the base of the nearby peaks. There are some low lying grass and moss here so there are mountain goats that frequent this area. This part of the hike is the absolute highlight as it is still quite a pleasant work out and many portions I would even consider flat – but the views are just jaw-droppingly-gorgeous! Its a valley so there is absolutely nothing in the way to hide all this beauty.
Keep following the path to the edge of the mountain where you can be treated to a 360 view of the area at an upper elevation. This is where the pass ends. We sat here to have our break and had a very nice lunch overlooking glaciers and mountains.
Recommendations
Use of a map or gps is only slightly recommend according to the conditions.. The trail is well marked and well used. There is some caution to consider during the spring where the paths may not be visible or obvious.
Wildlife: Saw herds of mountain goats passing through this area relaxing and grazing. What a sight to see. Moose, Elk, deer, bears and more are also known to be in the area of the national park.
Equipment: Hiking poles and shoes, camera, water, food for a picnic.
All Trails Link Wilcox Pass Trail, Alberta, Canada – 240 Reviews, Map | AllTrails
Photos from the Trail
Athabasca Glacier Toe
Location
Jasper National Park
Icefield Parkway
Difficulty
Easy
60m Elevation Gain
Duration
0.5-1 hour
1.5km
The trail is well marked and well used. It is also very popular. There is also a tourist center nearby with many amenities – restaurant, hotel, cafe, bathrooms, etc. The trail starts at the parking lot at the bottom of the glacier. This is where the rocky ascent starts. Its pretty steep at the very start but at this current year, it is not a super far walk. Maybe in another hundred years, when the glacier sadly recedes more, this will be a lot longer and harder.
The trail itself is just basically rocks worn down through the years. It can be pretty flat but also pretty steep at times. When the glacier finally comes into view, its size is hard to imagine.
At the end of the hike, at the toe of the glacier, there is absolutely no shelter from both the wind and the sun. I would highly recommend being prepared for this. The sun can be pretty harsh especially bouncing off the ice and the snow all around. The wind can be ruthless, bone-chilling and never-ending.
Recommendations
Wildlife: No wild life seen except for the usual critters, birds etc.
Equipment: No real equipment recommended or required. Its a pretty easy hike. I would recommend some way to protect yourself from the glaring sun and cold winds.
All Trails Link: Toe of the Glacier Athabasca, Alberta, Canada – 2,281 Reviews, Map | AllTrails
Photos from the Trail
Wilcox Peak
Location
Jasper National Park
Icefield Parkway
Difficulty
Intermediate
950m Elevation Gain
Duration
6-8 Hours
13km
Well, you’ve done the Wilcox’s Pass. Whats next? You can take it further by climbing up along the ridge and summitting Mount Wilcox. In this section, we will dig deeper into this summit trail and explore what lies ahead.
First and foremost, hike up to the pass. Thats a sweaty 400m elevation gain. At this point, I would recommend having a quick break to get yourself ready for the next leg – the summit. The trail is not super straight forward and not marked at all. A moderate level of a trail-finding skill is recommended. There is a worn down trail but it just takes a little bit of experience on finding it and following it.
The climb starts at the right side of the mountain following up the ridge. This can work to your advantage especially since climbing up this ridge at this side can shelter you from strong gusts of wind coming in from the valleys.
There is also a fair bit of scrambling involved. Exposure level is not bad at all until the summit. It is consistent and starts early on the summit push. I would recommend having gloves to help grip and if it is terribly busy, perhaps a helmet. (twice now I have been in this area, and twice I have not seen a single other soul attempting the summit push so I dont think it would be busy enough for a helmet but you never know.)
Hiking poles are also recommended as it is a pretty strenuous hike. The difficulty increases significantly after the pass and it is a consistent uphill battle and it can get pretty steep. Luckily, the distance covered is actually not that long (from the pass.)
What is impressive about this hike is the absolute gorgeous views constantly seen during the summit push. Elevation is gained quite significantly and the views are just absolutely gorgeous. Don’t even get me started on the views at the top.
Reaching the top, the exposure levels does get a bit more uncomfortable and exposure to the weather can also be quite severe. Luckily the ridge going up to the top is quite wide and there is still a fair bit of shelter from the surrounding rock. Nothing beats finally getting over a ridge and seeing what the other sides look like. Here at the top, the ridge turns into the summit and the beauty simply unfolds in front of you. The views of the mountains, the glaciers and the peaks are unforgettable.
Recommendations
Use of a map or gps is recommended.. The trail is well marked and well worn only at the point of the pass. After this, significant trail-finding is involved.
Wildlife: Many mountain goats and sheeps frequent the area as the valley is a great source of pasture. I have personally seen over 2 dozens here. There are also the common critters and birds around. Bears, elk, moose and more are also common in the area.
Equipment: Hiking poles and proper shoes. Enough replenishment and water. Hiking gloves for the scrambling. Maybe a helmet if it gets super busy (though I have never seen it super busy)
All Trails Link Mount Wilcox, Alberta, Canada – 253 Reviews, Map | AllTrails
Photos from the Trail
Boundary Peak
Location
Jasper National Park
Icefield Parkway
Difficulty
Hard
900m Elevation Gain
Duration
6-8 hours
8km
This summit is named “Boundary Peak” because the peak sits on the literal boundary between the Canadian provinces of British Columbia and Alberta. The trailhead starts by the Athabasca Glacier. I parked my van at the bottom parking lot by the toe of the glacier. Instead of heading towards the toe, the trail actually veers to the left – onto the flat, ascending rocky path taken by the Columbia Icefield Ice Explorer (this is the vehicle that tourists can book to take them up to the glacier.)
Instead of fully following up to the glacier, the trail further veers once again to the left and onto new mountains. The trail is faint but it is there. Some trail-finding skills may be required to navigate towards the summit. I would highly recommend using the Alltrails map as it tremendously helps keeping on course.
This hike is a bit of a slug-fest as the ascent never really stops. As you climb the mountain, the views of the surrounding areas unfolds itself right in front of you – make sure to have a look here and there to encourage yourself to keep on going forward. I would say, the first 80% of the trail is a intermediate climb of endless uphill. However, the last 20% is what makes it a truly hard trail.
From a solid rocky climb, the last summit push introduces a new challenge; a shale scree uphill climb. The ascent is steep and the constant battle of going up a scree really takes this one up a notch. Nothing is more frustrating than going up two steps up and one step down the scree. Not only is this one so physically challenging but it can also be mentally exhausting.
Once at the top, the ridge totally exposes you to the other side of the mountains – more jaw-dropping glaciers, terrifying winds and a breath-taking view all around.
The downhill hike is actually quite nice as one can easily “ski” down the scree. This may require some experience but it is a very fun time indeed. After this, it is a relentless downhill hike to the bottom again so make sure your already-tired body is ready for this one!
Recommendations
Use of a map or gps is highly recommend. The trail is marked with some cairns and is well used but can easily be lost. I would highly recommend experience with scree and some level of trail-finding.
Wildlife: Did not see too many wildlife.
Equipment: Hiking poles and hiking shoes. A camera and enough water and food. There is very little shade from the sun so make sure to be prepared if hiking during a sunny day. The gusting winds at the top can also be dreadfully strong.
All Trails Link: Boundary Peak Route, Alberta, Canada – 179 Reviews, Map | AllTrails
Photos from the Trail
Grissette Mountain Ridge
Location
Jasper National Park
Town of Jasper
Difficulty
Hard
1330m Elevation Gain
Duration
6-8 hours
Approx 9km
I would almost count this hike as Harder than hard but there are a couple of things to consider: I had started this hike quite late, quite ignorant of what lies ahead, and unprepared. Due to these, it may seem that the hike was a lot harder than it really was.
The trail starts at the Maligne Canyon Kitchen – this is where I parked my van for the day to tackle this hike. After a short walk up the road, ( maybe 200m?) a slight trail can be made out going into the woods. This part is a bit hard to find so make sure you stick to the Alltrails map. This first part of the hike was also fairly unkept – some dead falls, overgrown brush and trees and branches always in the way. Sufficed to say, not a lot of people go through this hike.
The majority of the hike is spent ascending up a forest. “Ascending” is a bit of a cop out term. I remember it more like crawling up hill. It was that steep. It felt like an endless stairway uphill but instead of stairs, I had to make do with slippery dry dirt and sketchy footholds. Deep in the forest, there isn’t much of a view. It is even hard to see where exactly you’re headed to as most of the hike is spent in the trees.
However, about 75% through the hike, you start climbing above the tree lines. The foliage starts to thin and a view starts to take shape. The dry dirt path is eventually replaced by rocky uphill scrambles up the face of the mountain. Eventually, the climb evolves onto a boulder field. Here, the steep ascent is made bearable by jaw dropping views of the surrounding areas. Better yet, climb up above to the ridge-line and you are treated to a full 360 degree view of the giant ancient peaks and valleys in the Jasper region.
Unfortunately for me, I was quite ignorant of all this. I saw the hike on All trails and without doing much more research, I went head first into it. I found that I did not bring enough water or food for the intense struggle I signed myself up to. I was also taken aback by how hard and steep the climb was. Of course, 1300m ascent over a matter of 4.5km is a no brainer. I also eventually ran out of battery on my phone and camera so that was not pleasant either – I worried a lot about getting lost on the way down.
Take this section as a warning dear reader: don’t be like me. Make sure you are prepared for this hike and the challenges it presents and you will be handsomely rewarded with beautiful views after a tough hike.
Recommendations
Use of a map or gps is only heavily recommended. The trail is not well marked and is not well-used. There is a semblance of a trail but a concrete trail finding skill is required. Bring extra batteries and food and water as this hike is a tough one.
Wildlife: Did not see too many wildlife, other than the common birds and critters. However, Moose, Elk, deer, bears and more are known to be in the area of the national park. I did see a cute family of Grey Partridges on my way down.
Equipment: Hiking poles and hiking shoes. A camera, enough water and food. A good map. Extra batteries.
Old Man Trail via Roche Bonhomme Route, Alberta, Canada – 498 Reviews, Map | AllTrails
Photos from the Trail
Maligne Canyon
Location
Jasper National Park
Near the Town of Jasper
Difficulty
Cake
130m Elevation Gain
Duration
0.5-1 hour
3.5km
Maligne Canyon is one of Jasper’s main tourist attraction and for a good reason. It is a very accessible and easy place to explore a beautiful phenomenon from mother nature herself. Drive up to the parking lot and rest easy as there are plenty of amenities around such as washrooms, restaurants and cafes. The path is also very straight forward, safe, well marked and well used. This is a great place to enjoy the Canadian Rockies with the family.
Recommendations
Use of a map or gps is not recommend as it is well marked, well maintained and well used..
Wildlife: Did not see too many wildlife, other than the common birds and critters. However, Moose, Elk, deer, bears and more are known to be in the area of the national park.
Equipment: A camera.
All Trails Link Maligne Canyon Loop [CLOSED], Alberta, Canada – 4,757 Reviews, Map | AllTrails
Photos from the Trail
Athabasca Falls
Location
Jasper National Park
Near the Town of Jasper
Difficulty
Cake
20m Elevation Gain
Duration
0.5-1 hour
1km
Right before the town of Jasper, sits another major tourist attraction – Athabasca Falls. This is a very iconic place to be. The trail itself is very easy, well marked, safe, and beautiful. The hardest part of this whole thing is finding a good parking spot as there are usually a fair bit of visitors checking this place out. There are also other activities available nearby such as white-water rafting. Great for the family.
Its a great beautiful place to explore and experience a beautiful natural sight! Just watch out and make sure you stay within the safety of the barricades as there are some serious consequences if one falls into the canyon.
Recommendations
Use of a map or gps is not recommended. The trail is well marked and well used. Make sure you stay within the barriers.
Wildlife: Did not see too many wildlife, other than the common birds and critters. However, Moose, Elk, deer, bears and more are known to be in the area of the national park.
Equipment: A camera.
All Trails Link Athabasca Falls, Alberta, Canada – 2,910 Reviews, Map | AllTrails
Photos from the Trail
Sunwapta Falls
Location
Jasper National Park
Difficulty
Cake
150m Elevation Gain
Duration
0.5-1 hour
3.2km
Another great accessible and easy place to check out before the Town of Jasper – Sunwapta Falls. The trail itself is very easy, well marked and well used. It is hard to miss and get lost at. The views are beautiful as per usual for the Canadian Rockies.
Recommendations
Use of a map or gps is only slightly recommend.. The trail is well marked and well used.
Wildlife: Did not see too many wildlife, other than the common birds and critters. However, Moose, Elk, deer, bears and more are known to be in the area of the national park.
Equipment: A camera. Food and water for a picnic.
All Trails Link Sunwapta Falls, Alberta, Canada – 2,353 Reviews, Map | AllTrails
Photos from the Trail
Kananaskis Provincial Park
Prairie View + Barrier Lake
Location
Kananaskis
Barrier Lake
Difficulty
Sweaty
600m Elevation Gain
Duration
3-4 hours
11.5km
Prairie View Trail, Alberta, Canada – 5,436 Reviews, Map | AllTrails
Sentinel’s Pass is one of my favourite all-time hikes in the Rockies. I’ve done it a handful of times and each time my love for the hike is further cemented. It has got everything – an initial view of the magnificent Lake Moraine, a hike in the forest, incredible jaw dropping views up to the pass and a well-marked trail. The whole way up, one follows a well-trodden path. It is hard to miss especially if you follow the consistent stream of other hikers there with you. I have done this hike in both the summer and fall seasons and I must say the autumn takes the cake. It is no surprise that this hike is extremely popular during this time of the year.
After the Lake Moraine, you start to climb up a dense forest with many switchbacks. At the end, it turns into a plateau full of golden larches with a stream to the side. As you climb farther up, the plateau opens up and the valley unfolds itself in front of you giving way to an open sky view of the mountains and glaciers surrounding the area. In this valley sits two separate lakes with their own distinct colours. Follow the trail up towards more rocky switchbacks and finally to the summit of the pass where you can choose to stay and have a nice lunch or go further and attempt to tackle the summits nearby.
This pass is special to me as it is one of the first full hikes I have done on my own here in the Rockies. The sheer beauty and surprise of the views on the other side of the pass is unforgettable.
This hike comes highly highly recommended. It does not require any special skill – just the willingness to climb 800m and 6km. I don’t think it is especially difficult; the only hard thing about this hike is now finding your way to get here as the road to Lake Moraine has gotten much more limited throughout the years. Through all the hardships however, this hike is absolutely worth it. I love this place, this hike, these mountains, these lakes and the memories here.
Recommendations
Use of a map or gps is only slightly recommend according to the conditions.. The trail is well marked and well used.
Wildlife: Did not see too many wildlife, other than the common birds and critters. However, Moose, Elk, deer, bears and more are known to be in the area of the national park.
Equipment: Hiking poles and shoes, camera, water, food for a picnic,
Prairie View Trail, Alberta, Canada – 5,436 Reviews, Map | AllTrails
Photos from the Trail
Mount Baldy (2 Summits)
Location
Kananaskis
Elbow-sheep wildland Provincial Park
Difficulty
Intermediate
800m Elevation Gain
Duration
4-6 hours
7km
Mount Baldy Peak, Alberta, Canada – 1,023 Reviews, Map | AllTrails
Sentinel’s Pass is one of my favourite all-time hikes in the Rockies. I’ve done it a handful of times and each time my love for the hike is further cemented. It has got everything – an initial view of the magnificent Lake Moraine, a hike in the forest, incredible jaw dropping views up to the pass and a well-marked trail. The whole way up, one follows a well-trodden path. It is hard to miss especially if you follow the consistent stream of other hikers there with you. I have done this hike in both the summer and fall seasons and I must say the autumn takes the cake. It is no surprise that this hike is extremely popular during this time of the year.
After the Lake Moraine, you start to climb up a dense forest with many switchbacks. At the end, it turns into a plateau full of golden larches with a stream to the side. As you climb farther up, the plateau opens up and the valley unfolds itself in front of you giving way to an open sky view of the mountains and glaciers surrounding the area. In this valley sits two separate lakes with their own distinct colours. Follow the trail up towards more rocky switchbacks and finally to the summit of the pass where you can choose to stay and have a nice lunch or go further and attempt to tackle the summits nearby.
This pass is special to me as it is one of the first full hikes I have done on my own here in the Rockies. The sheer beauty and surprise of the views on the other side of the pass is unforgettable.
This hike comes highly highly recommended. It does not require any special skill – just the willingness to climb 800m and 6km. I don’t think it is especially difficult; the only hard thing about this hike is now finding your way to get here as the road to Lake Moraine has gotten much more limited throughout the years. Through all the hardships however, this hike is absolutely worth it. I love this place, this hike, these mountains, these lakes and the memories here.
Recommendations
Use of a map or gps is only slightly recommend according to the conditions.. The trail is well marked and well used.
Wildlife: Did not see too many wildlife, other than the common birds and critters. However, Moose, Elk, deer, bears and more are known to be in the area of the national park.
Equipment: Hiking poles and shoes, camera, water, food for a picnic,
Prairie View Trail, Alberta, Canada – 5,436 Reviews, Map | AllTrails
Photos from the Trail
Wasootch Ridge
Location
Kananaskis
Elbow-sheep wildland Provincial Park
Difficulty
Hard
950m Elevation Gain
Duration
6-8 hours
14km
Wasootch Ridge Trail, Alberta, Canada – 4,005 Reviews, Map | AllTrails
Sentinel’s Pass is one of my favourite all-time hikes in the Rockies. I’ve done it a handful of times and each time my love for the hike is further cemented. It has got everything – an initial view of the magnificent Lake Moraine, a hike in the forest, incredible jaw dropping views up to the pass and a well-marked trail. The whole way up, one follows a well-trodden path. It is hard to miss especially if you follow the consistent stream of other hikers there with you. I have done this hike in both the summer and fall seasons and I must say the autumn takes the cake. It is no surprise that this hike is extremely popular during this time of the year.
After the Lake Moraine, you start to climb up a dense forest with many switchbacks. At the end, it turns into a plateau full of golden larches with a stream to the side. As you climb farther up, the plateau opens up and the valley unfolds itself in front of you giving way to an open sky view of the mountains and glaciers surrounding the area. In this valley sits two separate lakes with their own distinct colours. Follow the trail up towards more rocky switchbacks and finally to the summit of the pass where you can choose to stay and have a nice lunch or go further and attempt to tackle the summits nearby.
This pass is special to me as it is one of the first full hikes I have done on my own here in the Rockies. The sheer beauty and surprise of the views on the other side of the pass is unforgettable.
This hike comes highly highly recommended. It does not require any special skill – just the willingness to climb 800m and 6km. I don’t think it is especially difficult; the only hard thing about this hike is now finding your way to get here as the road to Lake Moraine has gotten much more limited throughout the years. Through all the hardships however, this hike is absolutely worth it. I love this place, this hike, these mountains, these lakes and the memories here.
Recommendations
Use of a map or gps is only slightly recommend according to the conditions.. The trail is well marked and well used.
Wildlife: Did not see too many wildlife, other than the common birds and critters. However, Moose, Elk, deer, bears and more are known to be in the area of the national park.
Equipment: Hiking poles and shoes, camera, water, food for a picnic,
Prairie View Trail, Alberta, Canada – 5,436 Reviews, Map | AllTrails
Photos from the Trail
Elbow Lake + Rae Glacier
Location
Kananaskis
Elbow-sheep wildland Provincial Park
Difficulty
Easy + Sweaty
100-400m Elevation Gain
Duration
1-4 hours
4 – 8 km
Rae Glacier Trail, Alberta, Canada – 936 Reviews, Map | AllTrails
Elbow Lake, Alberta, Canada – 765 Reviews, Map | AllTrails
Sentinel’s Pass is one of my favourite all-time hikes in the Rockies. I’ve done it a handful of times and each time my love for the hike is further cemented. It has got everything – an initial view of the magnificent Lake Moraine, a hike in the forest, incredible jaw dropping views up to the pass and a well-marked trail. The whole way up, one follows a well-trodden path. It is hard to miss especially if you follow the consistent stream of other hikers there with you. I have done this hike in both the summer and fall seasons and I must say the autumn takes the cake. It is no surprise that this hike is extremely popular during this time of the year.
After the Lake Moraine, you start to climb up a dense forest with many switchbacks. At the end, it turns into a plateau full of golden larches with a stream to the side. As you climb farther up, the plateau opens up and the valley unfolds itself in front of you giving way to an open sky view of the mountains and glaciers surrounding the area. In this valley sits two separate lakes with their own distinct colours. Follow the trail up towards more rocky switchbacks and finally to the summit of the pass where you can choose to stay and have a nice lunch or go further and attempt to tackle the summits nearby.
This pass is special to me as it is one of the first full hikes I have done on my own here in the Rockies. The sheer beauty and surprise of the views on the other side of the pass is unforgettable.
This hike comes highly highly recommended. It does not require any special skill – just the willingness to climb 800m and 6km. I don’t think it is especially difficult; the only hard thing about this hike is now finding your way to get here as the road to Lake Moraine has gotten much more limited throughout the years. Through all the hardships however, this hike is absolutely worth it. I love this place, this hike, these mountains, these lakes and the memories here.
Recommendations
Use of a map or gps is only slightly recommend according to the conditions.. The trail is well marked and well used.
Wildlife: Did not see too many wildlife, other than the common birds and critters. However, Moose, Elk, deer, bears and more are known to be in the area of the national park.
Equipment: Hiking poles and shoes, camera, water, food for a picnic,
Prairie View Trail, Alberta, Canada – 5,436 Reviews, Map | AllTrails
Photos from the Trail
Rawson Lake
Location
Kananaskis
Peter Lougheed Provincial Park
Difficulty
Sweaty
500m Elevation Gain
Duration
2-4 hours
7km
Rawson Lake, Alberta, Canada – 5,336 Reviews, Map | AllTrails
Sentinel’s Pass is one of my favourite all-time hikes in the Rockies. I’ve done it a handful of times and each time my love for the hike is further cemented. It has got everything – an initial view of the magnificent Lake Moraine, a hike in the forest, incredible jaw dropping views up to the pass and a well-marked trail. The whole way up, one follows a well-trodden path. It is hard to miss especially if you follow the consistent stream of other hikers there with you. I have done this hike in both the summer and fall seasons and I must say the autumn takes the cake. It is no surprise that this hike is extremely popular during this time of the year.
After the Lake Moraine, you start to climb up a dense forest with many switchbacks. At the end, it turns into a plateau full of golden larches with a stream to the side. As you climb farther up, the plateau opens up and the valley unfolds itself in front of you giving way to an open sky view of the mountains and glaciers surrounding the area. In this valley sits two separate lakes with their own distinct colours. Follow the trail up towards more rocky switchbacks and finally to the summit of the pass where you can choose to stay and have a nice lunch or go further and attempt to tackle the summits nearby.
This pass is special to me as it is one of the first full hikes I have done on my own here in the Rockies. The sheer beauty and surprise of the views on the other side of the pass is unforgettable.
This hike comes highly highly recommended. It does not require any special skill – just the willingness to climb 800m and 6km. I don’t think it is especially difficult; the only hard thing about this hike is now finding your way to get here as the road to Lake Moraine has gotten much more limited throughout the years. Through all the hardships however, this hike is absolutely worth it. I love this place, this hike, these mountains, these lakes and the memories here.
Recommendations
Use of a map or gps is only slightly recommend according to the conditions.. The trail is well marked and well used.
Wildlife: Did not see too many wildlife, other than the common birds and critters. However, Moose, Elk, deer, bears and more are known to be in the area of the national park.
Equipment: Hiking poles and shoes, camera, water, food for a picnic,
Prairie View Trail, Alberta, Canada – 5,436 Reviews, Map | AllTrails
Photos from the Trail
Sarrail Ridge
Location
Kananaskis
Elbow-sheep wildland Provincial Park
Difficulty
Intermediate
1000m Elevation Gain
Duration
5-7 hours
7km
Sarrail Ridge via Rawson Lake Trail, Alberta, Canada – 4,926 Reviews, Map | AllTrails
Sentinel’s Pass is one of my favourite all-time hikes in the Rockies. I’ve done it a handful of times and each time my love for the hike is further cemented. It has got everything – an initial view of the magnificent Lake Moraine, a hike in the forest, incredible jaw dropping views up to the pass and a well-marked trail. The whole way up, one follows a well-trodden path. It is hard to miss especially if you follow the consistent stream of other hikers there with you. I have done this hike in both the summer and fall seasons and I must say the autumn takes the cake. It is no surprise that this hike is extremely popular during this time of the year.
After the Lake Moraine, you start to climb up a dense forest with many switchbacks. At the end, it turns into a plateau full of golden larches with a stream to the side. As you climb farther up, the plateau opens up and the valley unfolds itself in front of you giving way to an open sky view of the mountains and glaciers surrounding the area. In this valley sits two separate lakes with their own distinct colours. Follow the trail up towards more rocky switchbacks and finally to the summit of the pass where you can choose to stay and have a nice lunch or go further and attempt to tackle the summits nearby.
This pass is special to me as it is one of the first full hikes I have done on my own here in the Rockies. The sheer beauty and surprise of the views on the other side of the pass is unforgettable.
This hike comes highly highly recommended. It does not require any special skill – just the willingness to climb 800m and 6km. I don’t think it is especially difficult; the only hard thing about this hike is now finding your way to get here as the road to Lake Moraine has gotten much more limited throughout the years. Through all the hardships however, this hike is absolutely worth it. I love this place, this hike, these mountains, these lakes and the memories here.
Recommendations
Use of a map or gps is only slightly recommend according to the conditions.. The trail is well marked and well used.
Wildlife: Did not see too many wildlife, other than the common birds and critters. However, Moose, Elk, deer, bears and more are known to be in the area of the national park.
Equipment: Hiking poles and shoes, camera, water, food for a picnic,
Prairie View Trail, Alberta, Canada – 5,436 Reviews, Map | AllTrails
Photos from the Trail
Mist Mountain Hot Springs
Location
Kananaskis
Elbow-Sheep Wildlands Provincial Park
Difficulty
Intermediate
600m Elevation Gain
Duration
5-7 hours
7km
Mist Mountain Springs Trail, Alberta, Canada – 2,931 Reviews, Map | AllTrails
Sentinel’s Pass is one of my favourite all-time hikes in the Rockies. I’ve done it a handful of times and each time my love for the hike is further cemented. It has got everything – an initial view of the magnificent Lake Moraine, a hike in the forest, incredible jaw dropping views up to the pass and a well-marked trail. The whole way up, one follows a well-trodden path. It is hard to miss especially if you follow the consistent stream of other hikers there with you. I have done this hike in both the summer and fall seasons and I must say the autumn takes the cake. It is no surprise that this hike is extremely popular during this time of the year.
After the Lake Moraine, you start to climb up a dense forest with many switchbacks. At the end, it turns into a plateau full of golden larches with a stream to the side. As you climb farther up, the plateau opens up and the valley unfolds itself in front of you giving way to an open sky view of the mountains and glaciers surrounding the area. In this valley sits two separate lakes with their own distinct colours. Follow the trail up towards more rocky switchbacks and finally to the summit of the pass where you can choose to stay and have a nice lunch or go further and attempt to tackle the summits nearby.
This pass is special to me as it is one of the first full hikes I have done on my own here in the Rockies. The sheer beauty and surprise of the views on the other side of the pass is unforgettable.
This hike comes highly highly recommended. It does not require any special skill – just the willingness to climb 800m and 6km. I don’t think it is especially difficult; the only hard thing about this hike is now finding your way to get here as the road to Lake Moraine has gotten much more limited throughout the years. Through all the hardships however, this hike is absolutely worth it. I love this place, this hike, these mountains, these lakes and the memories here.
Recommendations
Use of a map or gps is only slightly recommend according to the conditions.. The trail is well marked and well used.
Wildlife: Did not see too many wildlife, other than the common birds and critters. However, Moose, Elk, deer, bears and more are known to be in the area of the national park.
Equipment: Hiking poles and shoes, camera, water, food for a picnic,
Prairie View Trail, Alberta, Canada – 5,436 Reviews, Map | AllTrails
Photos from the Trail
Emerald Lake Loop
Location
Yoho National Park
British Columbia
Difficulty
Easy
130m Elevation Gain
Duration
1-2 hours
7km
Emerald Lake Loop, British Columbia, Canada – 5,816 Reviews, Map | AllTrails
Sentinel’s Pass is one of my favourite all-time hikes in the Rockies. I’ve done it a handful of times and each time my love for the hike is further cemented. It has got everything – an initial view of the magnificent Lake Moraine, a hike in the forest, incredible jaw dropping views up to the pass and a well-marked trail. The whole way up, one follows a well-trodden path. It is hard to miss especially if you follow the consistent stream of other hikers there with you. I have done this hike in both the summer and fall seasons and I must say the autumn takes the cake. It is no surprise that this hike is extremely popular during this time of the year.
After the Lake Moraine, you start to climb up a dense forest with many switchbacks. At the end, it turns into a plateau full of golden larches with a stream to the side. As you climb farther up, the plateau opens up and the valley unfolds itself in front of you giving way to an open sky view of the mountains and glaciers surrounding the area. In this valley sits two separate lakes with their own distinct colours. Follow the trail up towards more rocky switchbacks and finally to the summit of the pass where you can choose to stay and have a nice lunch or go further and attempt to tackle the summits nearby.
This pass is special to me as it is one of the first full hikes I have done on my own here in the Rockies. The sheer beauty and surprise of the views on the other side of the pass is unforgettable.
This hike comes highly highly recommended. It does not require any special skill – just the willingness to climb 800m and 6km. I don’t think it is especially difficult; the only hard thing about this hike is now finding your way to get here as the road to Lake Moraine has gotten much more limited throughout the years. Through all the hardships however, this hike is absolutely worth it. I love this place, this hike, these mountains, these lakes and the memories here.
Recommendations
Use of a map or gps is only slightly recommend according to the conditions.. The trail is well marked and well used.
Wildlife: Did not see too many wildlife, other than the common birds and critters. However, Moose, Elk, deer, bears and more are known to be in the area of the national park.
Equipment: Hiking poles and shoes, camera, water, food for a picnic,
Prairie View Trail, Alberta, Canada – 5,436 Reviews, Map | AllTrails
Photos from the Trail
Emerald Peak (Counter Clockwise)
Location
Yoho National Park
British Columbia
Difficulty
Hard
1200m Elevation Gain
Duration
6-8 hours
10km
Emerald Peak via Hamilton Lake, British Columbia, Canada – 211 Reviews, Map | AllTrails
Sentinel’s Pass is one of my favourite all-time hikes in the Rockies. I’ve done it a handful of times and each time my love for the hike is further cemented. It has got everything – an initial view of the magnificent Lake Moraine, a hike in the forest, incredible jaw dropping views up to the pass and a well-marked trail. The whole way up, one follows a well-trodden path. It is hard to miss especially if you follow the consistent stream of other hikers there with you. I have done this hike in both the summer and fall seasons and I must say the autumn takes the cake. It is no surprise that this hike is extremely popular during this time of the year.
After the Lake Moraine, you start to climb up a dense forest with many switchbacks. At the end, it turns into a plateau full of golden larches with a stream to the side. As you climb farther up, the plateau opens up and the valley unfolds itself in front of you giving way to an open sky view of the mountains and glaciers surrounding the area. In this valley sits two separate lakes with their own distinct colours. Follow the trail up towards more rocky switchbacks and finally to the summit of the pass where you can choose to stay and have a nice lunch or go further and attempt to tackle the summits nearby.
This pass is special to me as it is one of the first full hikes I have done on my own here in the Rockies. The sheer beauty and surprise of the views on the other side of the pass is unforgettable.
This hike comes highly highly recommended. It does not require any special skill – just the willingness to climb 800m and 6km. I don’t think it is especially difficult; the only hard thing about this hike is now finding your way to get here as the road to Lake Moraine has gotten much more limited throughout the years. Through all the hardships however, this hike is absolutely worth it. I love this place, this hike, these mountains, these lakes and the memories here.
Recommendations
Use of a map or gps is only slightly recommend according to the conditions.. The trail is well marked and well used.
Wildlife: Did not see too many wildlife, other than the common birds and critters. However, Moose, Elk, deer, bears and more are known to be in the area of the national park.
Equipment: Hiking poles and shoes, camera, water, food for a picnic,
Prairie View Trail, Alberta, Canada – 5,436 Reviews, Map | AllTrails
Photos from the Trail
Mt. Stephen Trilobite Beds
Location
Yoho National Park
Town of Field
Difficulty
Moderate
800m Elevation Gain
Duration
4-6 hours
7km
Mount Stephen Quarry, British Columbia, Canada – 103 Reviews, Map | AllTrails
Sentinel’s Pass is one of my favourite all-time hikes in the Rockies. I’ve done it a handful of times and each time my love for the hike is further cemented. It has got everything – an initial view of the magnificent Lake Moraine, a hike in the forest, incredible jaw dropping views up to the pass and a well-marked trail. The whole way up, one follows a well-trodden path. It is hard to miss especially if you follow the consistent stream of other hikers there with you. I have done this hike in both the summer and fall seasons and I must say the autumn takes the cake. It is no surprise that this hike is extremely popular during this time of the year.
After the Lake Moraine, you start to climb up a dense forest with many switchbacks. At the end, it turns into a plateau full of golden larches with a stream to the side. As you climb farther up, the plateau opens up and the valley unfolds itself in front of you giving way to an open sky view of the mountains and glaciers surrounding the area. In this valley sits two separate lakes with their own distinct colours. Follow the trail up towards more rocky switchbacks and finally to the summit of the pass where you can choose to stay and have a nice lunch or go further and attempt to tackle the summits nearby.
This pass is special to me as it is one of the first full hikes I have done on my own here in the Rockies. The sheer beauty and surprise of the views on the other side of the pass is unforgettable.
This hike comes highly highly recommended. It does not require any special skill – just the willingness to climb 800m and 6km. I don’t think it is especially difficult; the only hard thing about this hike is now finding your way to get here as the road to Lake Moraine has gotten much more limited throughout the years. Through all the hardships however, this hike is absolutely worth it. I love this place, this hike, these mountains, these lakes and the memories here.
Recommendations
Use of a map or gps is only slightly recommend according to the conditions.. The trail is well marked and well used.
Wildlife: Did not see too many wildlife, other than the common birds and critters. However, Moose, Elk, deer, bears and more are known to be in the area of the national park.
Equipment: Hiking poles and shoes, camera, water, food for a picnic,
Prairie View Trail, Alberta, Canada – 5,436 Reviews, Map | AllTrails
Photos from the Trail
Check Out More of Our Catalogue!
Destinations
- Alberta
- Austria
- Blog
- British Columbia
- Cambodia
- Camping
- Czechia
- Discover
- East Asia
- Europe
- Experience
- Explore
- France
- Gallery
- Germany
- Get Away
- Hiking
- Hungary
- Indonesia
- Italy
- Japan
- Malaysia
- Midwest United States
- Nepal
- North America
- Northeast United States
- Nova Scotia
- Ontario
- Philippines
- Quebec
- Romania
- Singapore
- South East Asia
- South Korea
- Southeast United States
- Southwest United States
- Thailand
- Travel as a Necessity
- Türkiye
- Vietnam
- Western Unitedstates

Turkey Trouble
This is an open letter to whoever is planning to land in one of Türkiye’s international airports – the Istanbul Airport. My message is short and clear : Watch Out. please read all the way to the editor’s note at the bottom for a full explanation! But first, dear reader, let me take you back…

Poonhill Trek: What is required and costs
Hiking the Himalayas : Poonhill Mountains hold a certain magic – the towering behemoths have a tight grip on people’s hearts. People naturally just love the mountains. I am personally very guilty of this. Ever since I stepped foot in the Canadian Rockies , I became a victim amongst many others of its many charms.…

Deep in the Sumatran Jungle
Two Days One Night Jungle Buzz We knew Sumatra as a distant island from its more popular brothers Bali and Java; we knew it from its great coffee beans we often buy in Costco and from the critically endangered Orangutans that can be found deep in its jungles. After some research, we committed on a…
